[This is the sixth article in this series. The previous one can be found here].
Summary
Now, we are going to isolate network resources with the help of network
namespaces, veth devices and Linux bridge.
Basics
Network namespace
Network namespaces provide isolation of the system resources associated with networking: network devices, IPv4 and IPv6 protocol stacks, IP routing tables, firewall rules, port numbers (sockets), etc [1].
There is really nothing special to talk about network namespaces because unlike PID namespace or mount namespace, there is no parent-child or any kind of complex relationship between two network namespaces. Each of them is a independent network stack, just like networks on two different hosts.
You can use ip utility to manage network namespaces. To create a network
namespace, run
$ sudo ip netns add netns1
You can configure the network in this namespace with ip utility almost the
same way as you would normally do on a host - except that you need to add a
prefix ip netns exec <netns_name>. For example, to view all network devices
in the newly created network namespace, run
$ sudo ip netns exec netns1 \
       ip addr show
1: lo: <LOOPBACK> mtu 65536 qdisc noop state DOWN group default qlen 1000
    link/loopback 00:00:00:00:00:00 brd 00:00:00:00:00:00
By default, a loopback device is created with state DOWN. Let’s bring it up.
$ sudo ip netns exec netns1 \
       ip link set dev lo up
$ sudo ip netns exec netns1 \
       ping -c 3 127.0.0.1
PING 127.0.0.1 (127.0.0.1) 56(84) bytes of data.
64 bytes from 127.0.0.1: icmp_seq=1 ttl=64 time=0.019 ms
64 bytes from 127.0.0.1: icmp_seq=2 ttl=64 time=0.025 ms
64 bytes from 127.0.0.1: icmp_seq=3 ttl=64 time=0.030 ms

--- 127.0.0.1 ping statistics ---
3 packets transmitted, 3 received, 0% packet loss, time 2031ms
rtt min/avg/max/mdev = 0.019/0.024/0.030/0.004 ms
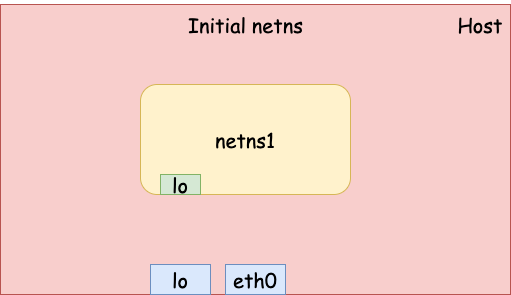
Now we have an new network namespace with one loopback device, which can’t talk to the outside world (yet).
veth device
veth stands for “Virtual Ethernet”. A veth device pair can be used as a
tunnel between two network namespaces. For example, we can run the following
command to create a veth pair. veth0 is created in the initial network
namespace whereas eth0 is created in netns1.
$ sudo ip link add veth0 type veth peer eth0 netns netns1

# veth0 is in the inital network namespace
$ ip addr show veth0
3: veth0@if2: <BROADCAST,MULTICAST> mtu 1500 qdisc noop state DOWN group default qlen 1000
    link/ether 22:f7:96:82:e9:ef brd ff:ff:ff:ff:ff:ff link-netns netns1

# eth0 is in netns1
$ sudo ip netns exec netns1 \
       ip addr show eth0
2: eth0@if6: <BROADCAST,MULTICAST> mtu 1500 qdisc noop state DOWN group default qlen 1000
    link/ether 46:18:d3:d1:20:9c brd ff:ff:ff:ff:ff:ff link-netnsid 0
Both devices don’t have an IP address yet and are DOWN by default. Let’s set up addresses and bring them up.
# veth0 on the host - 10.0.0.1
$ sudo ip addr add 10.0.0.1/16 dev veth0
$ sudo ip link set veth0 up

# eth0 in netns1 - 10.0.0.2
$ sudo ip netns exec netns1 \
       ip addr add 10.0.0.2/16 dev eth0
$ sudo ip netns exec netns1 \
       ip link set eth0 up
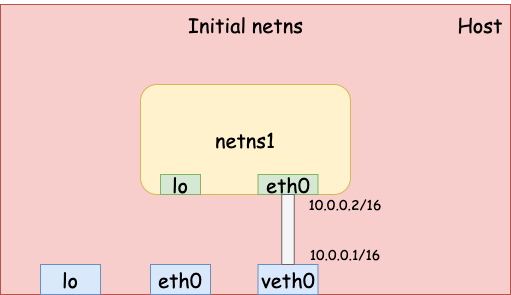
We just created a tunnel between the initial network namespace and the newly
created netns1. They can talk to each other now.
# Ping from the inital netns to netns1
$ ping -c 3 10.0.0.2
PING 10.0.0.2 (10.0.0.2) 56(84) bytes of data.
64 bytes from 10.0.0.2: icmp_seq=1 ttl=64 time=0.091 ms
64 bytes from 10.0.0.2: icmp_seq=2 ttl=64 time=0.034 ms
64 bytes from 10.0.0.2: icmp_seq=3 ttl=64 time=0.042 ms

--- 10.0.0.2 ping statistics ---
3 packets transmitted, 3 received, 0% packet loss, time 2056ms
rtt min/avg/max/mdev = 0.034/0.055/0.091/0.025 ms

# Ping from netns1 to the initial netns
sudo ip netns exec netns1 ping -c 3 10.0.0.1
PING 10.0.0.1 (10.0.0.1) 56(84) bytes of data.
64 bytes from 10.0.0.1: icmp_seq=1 ttl=64 time=0.025 ms
64 bytes from 10.0.0.1: icmp_seq=2 ttl=64 time=0.034 ms
64 bytes from 10.0.0.1: icmp_seq=3 ttl=64 time=0.034 ms

--- 10.0.0.1 ping statistics ---
3 packets transmitted, 3 received, 0% packet loss, time 2049ms
rtt min/avg/max/mdev = 0.025/0.031/0.034/0.004 ms
Now we have a network namespace with one loopback device lo and one veth
device eth0 that connects to the initial network namespace (the physical
network).
Bridge network
The previous example demonstrated how to connect two network namespaces using a
pair of veth devices. To connect 3 or more network namespaces, we can
leverage Linux bridge. Since I have already talked about Linux bridge in a
previous article, here, I
will only show an example of connecting 2 or more containers (network
namespaces) using a bridge.
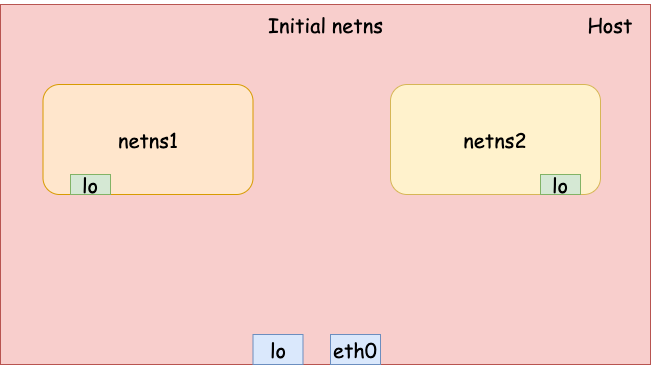
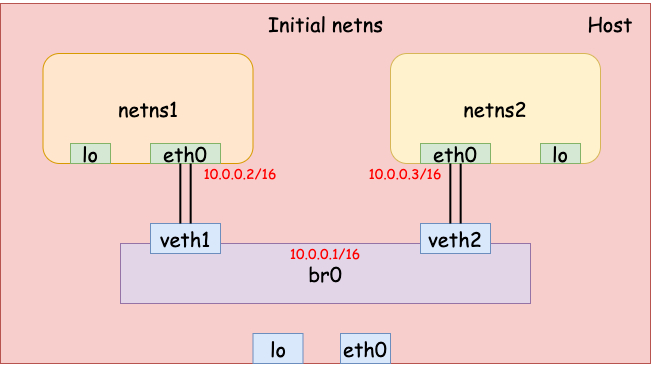
First, let’s create 2 network namespaces with name netns1 and netns2.
# Create 2 network namespaces
$ sudo ip netns add netns1
$ sudo ip netns add netns2

# Bring up loopback device
$ sudo ip netns exec netns1 \
       ip link set lo up
$ sudo ip netns exec netns2 \
       ip link set lo up
Second, we add 2 veth pairs for the two network namespaces.
# veth1 (host) <--> eth0 (netns1)
$ sudo ip link add veth1 type veth peer eth0 netns netns1

# veth2 (host) <--> eth0 (netns2)
$ sudo ip link add veth2 type veth peer eth0 netns netns2

Third, we create a bridge and attach the two veth devices on the host to the
bridge.
# Create a bridge br0
$ sudo ip link add name br0 type bridge

# veth1 -- br0
$ sudo ip link set dev veth1 master br0

# veth2 -- br0
$ sudo ip link set dev veth2 master br0
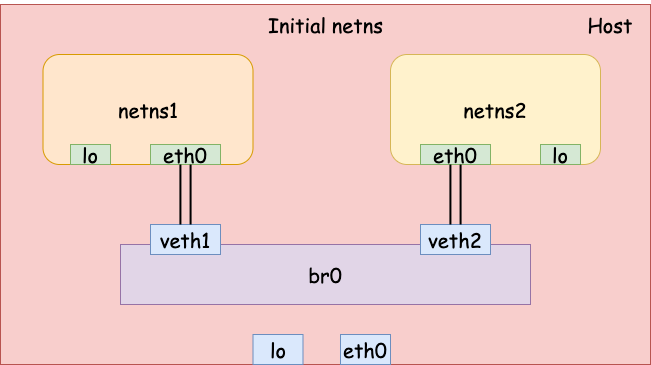
Finally, we set the IP address on each interface and bring them all up. Now the two network namespaces should be able to talk to each other via the bridge.
# br0 - 10.0.0.1/16
$ sudo ip addr add 10.0.0.1/16 dev br0
$ sudo ip link set dev br0 up
$ sudo ip link set dev veth1 up
$ sudo ip link set dev veth2 up

# eth0 (netns1) - 10.0.0.2/16.
$ sudo ip netns exec netns1 \
       ip addr add 10.0.0.2/16 dev eth0
$ sudo ip netns exec netns1 \
       ip link set dev eth0 up

# eth0 (netns2) - 10.0.0.3/16.
$ sudo ip netns exec netns2 \
       ip addr add 10.0.0.3/16 dev eth0
$ sudo ip netns exec netns2 \
       ip link set dev eth0 up

# Now netns1 and netns2 should be able to talk to each other
$ sudo ip netns exec netns1 ping -c 3 10.0.0.3
PING 10.0.0.3 (10.0.0.3) 56(84) bytes of data.
64 bytes from 10.0.0.3: icmp_seq=1 ttl=64 time=0.073 ms
64 bytes from 10.0.0.3: icmp_seq=2 ttl=64 time=0.051 ms
64 bytes from 10.0.0.3: icmp_seq=3 ttl=64 time=0.028 ms

--- 10.0.0.3 ping statistics ---
3 packets transmitted, 3 received, 0% packet loss, time 2039ms
rtt min/avg/max/mdev = 0.028/0.050/0.073/0.018 ms

$ sudo ip netns exec netns2 ping -c 3 10.0.0.2
PING 10.0.0.2 (10.0.0.2) 56(84) bytes of data.
64 bytes from 10.0.0.2: icmp_seq=1 ttl=64 time=0.031 ms
64 bytes from 10.0.0.2: icmp_seq=2 ttl=64 time=0.048 ms
64 bytes from 10.0.0.2: icmp_seq=3 ttl=64 time=0.032 ms

--- 10.0.0.2 ping statistics ---
3 packets transmitted, 3 received, 0% packet loss, time 2033ms
rtt min/avg/max/mdev = 0.031/0.037/0.048/0.007 ms
Internet access
Even though the two hosts can talk to each other, they can’t access the Internet yet. We need to configure IP forwarding and NAT on the host to enable Internet access for the containers.
# Set the bridge as the default gateway in the two namespaces
$ sudo ip netns exec netns1 ip route add default via 10.0.0.1
$ sudo ip netns exec netns2 ip route add default via 10.0.0.1

# Enable IP forwarding
$ sudo sysctl -w net.ipv4.ip_forward=1
net.ipv4.ip_forward = 1

# Enable NAT for 10.0.0.0/16 network
$ sudo iptables -t nat -A POSTROUTING -s 10.0.0.0/16 -j MASQUERADE

# Now, they can access the Internet
$ sudo ip netns exec netns1 ping -c 3 8.8.8.8
PING 8.8.8.8 (8.8.8.8) 56(84) bytes of data.
64 bytes from 8.8.8.8: icmp_seq=1 ttl=116 time=100.0 ms
64 bytes from 8.8.8.8: icmp_seq=2 ttl=116 time=33.5 ms
64 bytes from 8.8.8.8: icmp_seq=3 ttl=116 time=19.0 ms

--- 8.8.8.8 ping statistics ---
3 packets transmitted, 3 received, 0% packet loss, time 2005ms
rtt min/avg/max/mdev = 18.969/50.811/99.994/35.277 ms
If you run tcpdump on the host, you will find the source IP is the host IP
because of NAT.
$ sudo tcpdump -i ens33 -n icmp
tcpdump: verbose output suppressed, use -v or -vv for full protocol decode
listening on ens33, link-type EN10MB (Ethernet), capture size 262144 bytes
20:23:15.963592 IP 192.168.1.39 > 8.8.8.8: ICMP echo request, id 3994, seq 1, length 64
20:23:15.976225 IP 8.8.8.8 > 192.168.1.39: ICMP echo reply, id 3994, seq 1, length 64
20:23:16.964833 IP 192.168.1.39 > 8.8.8.8: ICMP echo request, id 3994, seq 2, length 64
20:23:16.983235 IP 8.8.8.8 > 192.168.1.39: ICMP echo reply, id 3994, seq 2, length 64
20:23:17.966907 IP 192.168.1.39 > 8.8.8.8: ICMP echo request, id 3994, seq 3, length 64
20:23:17.983764 IP 8.8.8.8 > 192.168.1.39: ICMP echo reply, id 3994, seq 3, length 64
Mini container: Network Isolation
Requirements
The network isolation requirements of our mini container are:
- Each container should have their own network resources including devices, IP stack, firewall policies, etc.
- One container shouldn’t see network configurations on other containers.
- Containers on the same host can talk to each other.
The first 2 requirements can be easily fulfilled by putting each container in its own network namespace and the third requirement can be achieved by Linux Bridge.
Implementation
The implementation of network isolation can be as simple as shelling out to the
ip commands we ran above. Or we can use netlink or ioctl to configure the
network programmatically. For simplicity, I will just use ip command.
One thing to notice is that, before setting up the network in the container, we
need to create the veth pair in the parent process. Therefore, the child
process has to wait for parent process to finish preparing the network. We will
use a pipe to synchronize between parent (agent) and child (container) process.
Now the core code skeleton becomes
  int pipefd[2];
  if (pipe(pipefd[2])) {
    errExit("pipe");
  }
  int readfd = pipfd[0];
  int writefd = pipfd[1];

  int cpid = syscall(SYS_clone,
                     SIGCHLD |
                     CLONE_NEWNS |
                     CLONE_NEWPID |
                     CLONE_NEWUTS |
                     CLONE_NEWIPC |
                     CLONE_NEWNET);

  if (cpid == -1) {
    errExit("fork");
  }
  if (cpid == 0) {
    // Container
    // Wait until parent finishes any preparation.
    char buf;
    read(readfd, &buf, 1);
    close(readfd);
    close(writefd);

    setupNetwork(ip);
    setupFilesystem();
    execv(argv[1], &argv[1]);
  } else {
    // Agent
    // Prepare the network for the container.
    prepareNetwork(cpid);
    char buf = 0;
    write(writefd, &buf, 1);
    close(writefd);
    close(readfd);
  }

  if (waitpid(cpid, NULL, 0) == -1) {
    errExit("waitpid");
  }
  return 0;
For the complete source code, see this commit.
Conclusion
At this point, we have a container with its own filesystem, process space, hostname and NIS domain name, IPC objects and network.

Resources
[1] network_namespace
[2] veth
[3] ip-netns
[4] FORWARD and NAT Rules