Mini Container Series Part 1
[This is the second article in this series. The first one is here].
Summary
For the first step, we are going to make the container think that it owns the entire filesystem. This can be achieved by utilizing mount namespace and chroot. Out of all the namespaces, I start with mount namespace not only because it was the first namespace implemented but also because it is needed for other resource isolation as PID isolation (more details in the next article).
Let’s first look at some basics.
Basics
Mount
mount is the operation of attaching the filesystem on a device to the host’s filesystem tree. One example of using mount is, when you create a Linux virtual machine using VMware Fusion, it is recommended to install VMware Tools, which is provided as a virtual CDROM. After connecting the CDROM to the VM, the first thing to do is to mount it to the filesystem:
1
2
3
4
5
6
7
8
9
# Creat a mount point
$ sudo mkdir /mnt/cdrom

# Mount the CDROM
$ sudo mount /dev/cdrom /mnt/cdrom

# Now the content of the CD is accessible at /mnt/cdrom
$ ls /mnt/cdrom/
manifest.txt  run_upgrader.sh  VMwareTools-10.3.21-14772444.tar.gz  vmware-tools-upgrader-32  vmware-tools-upgrader-64
Bind mount
The source of a regular mount is a storage device whereas the source of bind mount is a directory. In other words, a bind mount makes an existing directory tree appear at a different point. The source and target directories will have the same content and any modification on one side will be reflected on the other.
Let’s look at an example.
1
2
3
4
5
6
7
8
9
10
11
12
13
14
15
16
17
18
19
20
21
22
23
24
25
26
27
28
29
30
31
32
33
34
35
36
37
38
39
40
41
42
43
44
# Create temp directories
$ mkdir /tmp/source /tmp/target
$ touch /tmp/source/foo /tmp/target/bar

# List contents of directories
$ tree /tmp/source
/tmp/source
└── foo

0 directories, 1 file

$ tree /tmp/target
/tmp/target
└── bar

0 directories, 1 file

# Bind mount source to target
$ sudo mount --bind /tmp/source /tmp/target

# Now two directories have the same structure
$ tree /tmp/source
/tmp/source
└── foo

0 directories, 1 file

$ tree /tmp/target
/tmp/target
└── foo

0 directories, 1 file

# Add a new file in /tmp/source
$ echo "Hello" > /tmp/source/hello

# It appears in /tmp/target
$ cat /tmp/target/hello
Hello

# Vice versa
$ echo "World" > /tmp/target/world
$ cat /tmp/source/world
World
Mount namespace
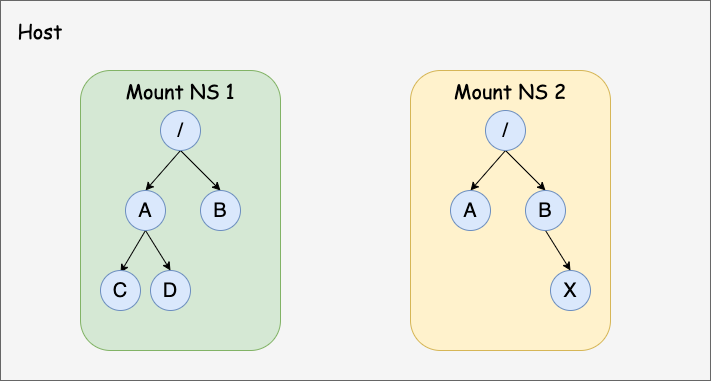
As the name implies, mount namespaces isolate the list of mount points seen by the processes in a namespace [4]. In other words, processes in different namespaces have different views of mount points in the system.
The API to create a mount namespace is very simple. We just need to pass CLONE_NEWNS flag to clone or unshare system call. Both will create a new namespace. The difference is, the former create a child process, which will enter the new mount namespace whereas the latter will make the calling process enter the new mount namespace.
The newly created namespace initially receives all mount points replicated from the caller’s namespace. Then what about mount points created in the original and new mount namespaces later? Will they be replicated to each other? The answer is, it depends on the propagation type of each mount point.
There are 4 propagation types and note that propagation type is a per-mount-point setting.
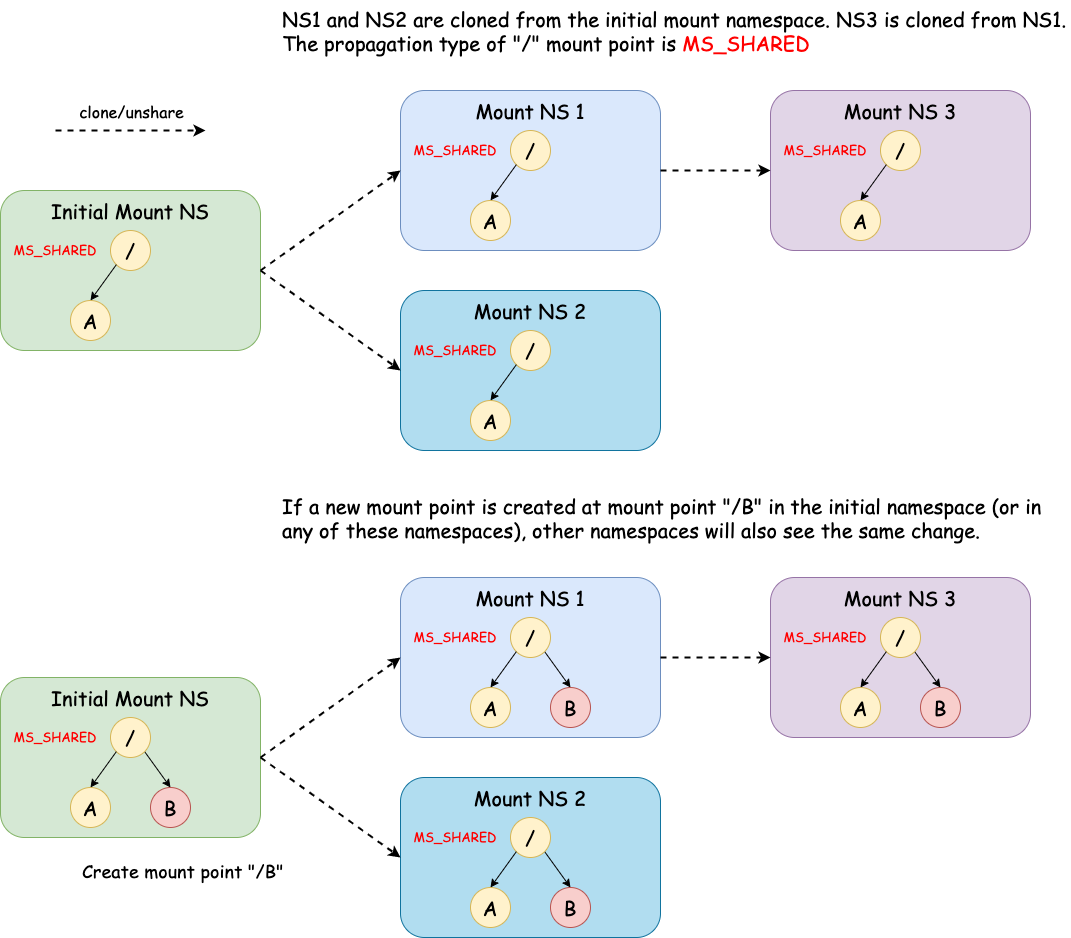
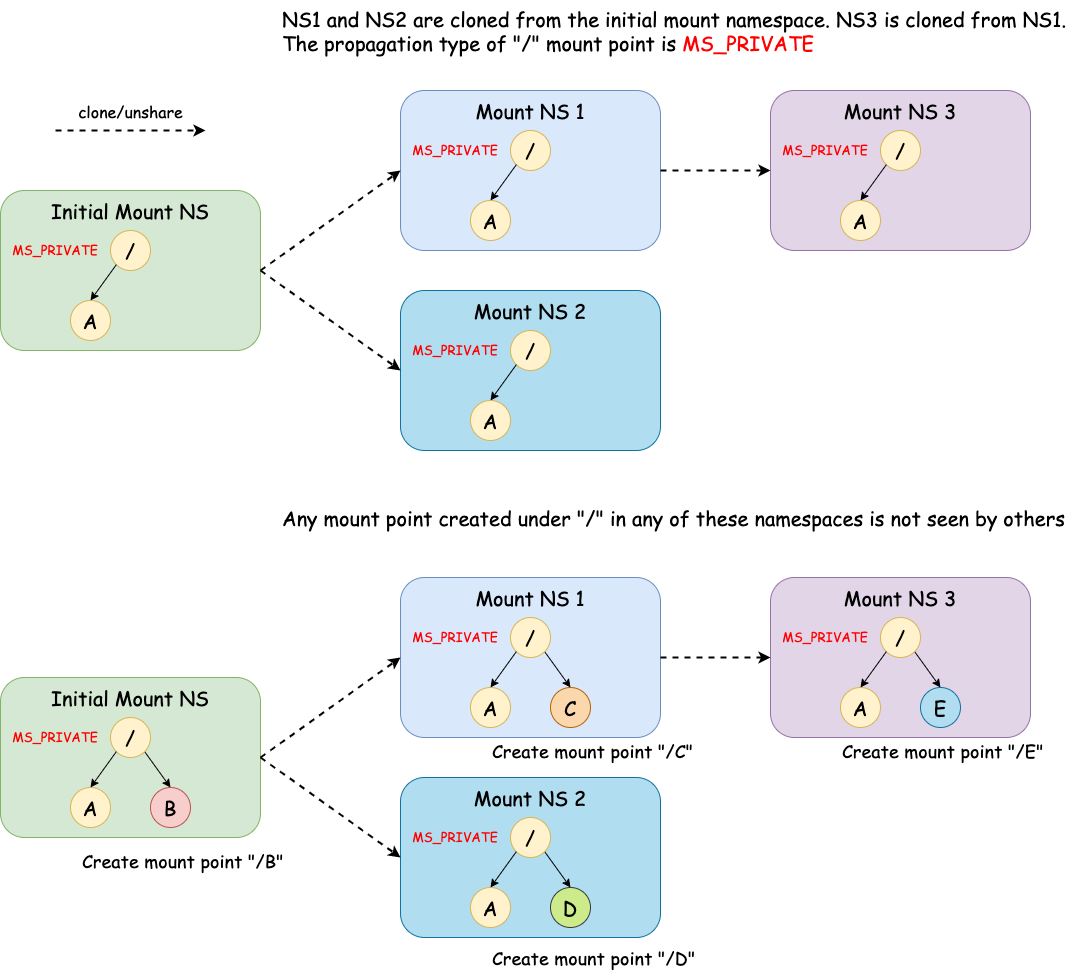
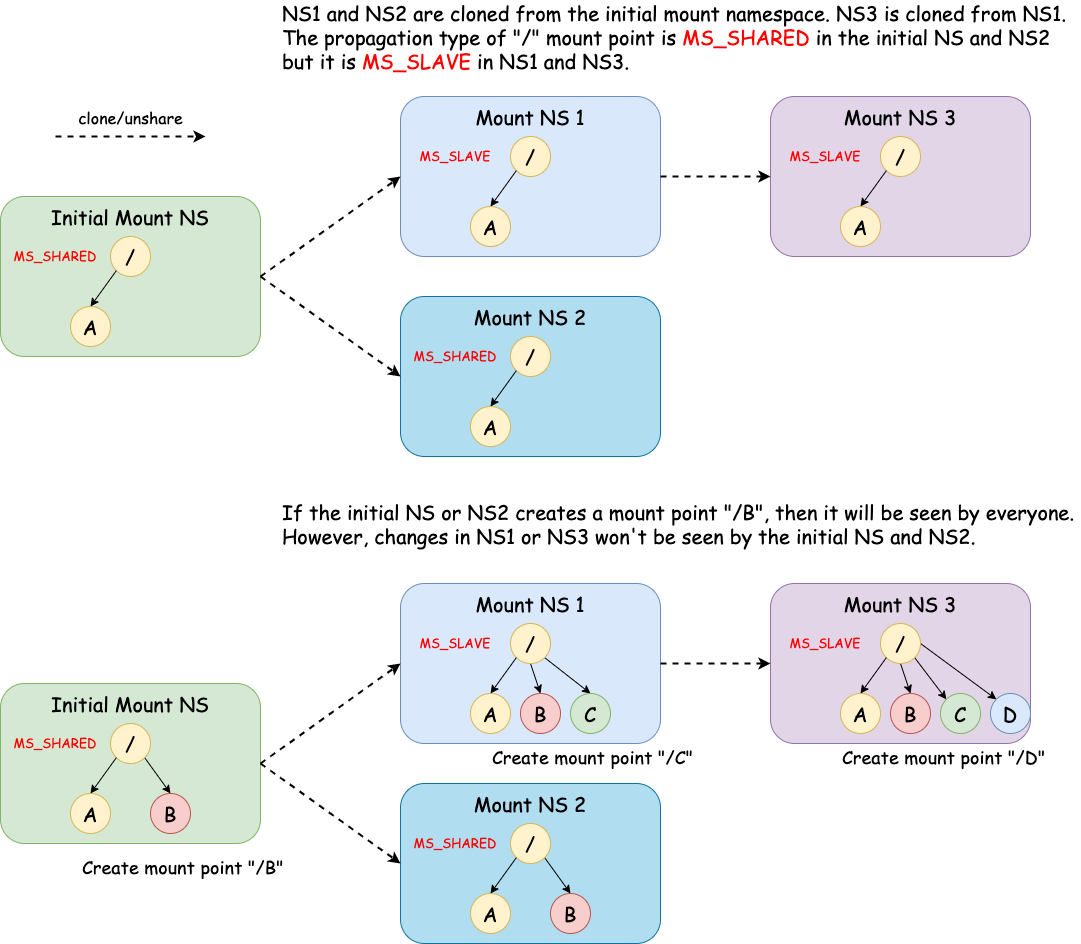
MS_SHARED: When changes are made under a mount point of this type in one namespace, the change will be propagated to other namespaces in the same peer group. A peer group is a group of mount points in different namespaces that share the same origin.MS_PRIVATE: This is the opposite ofMS_SHARED. A mount point of this type does not propagate/receive changes to/from peers.MS_SLAVE: A mount point of this type receives changes from peers but does not propagate changes to peers.Note that a mount point can be the slave of another peer group while at the same time sharing mount and unmount events with a peer group of which it is a member[3]. NS1 in the diagram above is this case. It is a slave of the peer group with the initial NS and NS2 while it also shares the mount point with NS3.
MS_UNBINDABLE: A mount point of this type can’t be the source of a bind mount operation. And similar toMS_PRIVATE, changes under this mount point does not propagate/receive changes to/from peers.1 2 3 4 5 6 7 8 9 10 11
# Make "/tmp/target" unbindable $ sudo mount --make-unbindable /tmp/target # Then it can't be the source of bind mount $ mkdir /tmp/target2 $ sudo mount --bind /tmp/target /tmp/target2 mount: /tmp/target2: wrong fs type, bad option, bad superblock on /tmp/target, missing codepage or helper program, or other error. # Mount info cat /proc/self/mountinfo | grep target 884 29 8:5 /tmp/source /tmp/target rw,relatime unbindable - ext4 /dev/sda5 rw,errors=remount-ro
Here I only talked about very basic stuff. In fact, mount types can get very complex. See Shared subtrees for more details.
chroot and pivot_root
While mount namespace restricts what mount points seen by a process, chroot controls what root directory (“/”) a process sees. In other words, if we create a root filesystem in directory “/A” and call chroot("A"), then this process will only have access to directories and files under “/A” but no other places and thinks it is root (“/”).
However, if only using chroot alone, the process may break out out this “chroot jail”, see this article for more details. Thus, we need the help of pivot_root, which changes the root mount in the mount namespace of the calling process [8].
If you repeat the escaping-chroot experiment in this article but calling pivot_root before chroot, the escaping should fail.
There is also an alternative of pivot_root - mount move, which moves a mount point from one place to another. This is the technique used by systemd.
mini_container: Filesystem isolation
Next, let’s apply what we’ve learned so far into practice.
Our requirements of filesystem isolations are:
- New mounted points created by the host should be seen by the container.
- New mounted points created by the container shouldn’t be seen by the host so that the container can’t mess up with the host.
- A container should only see files in its own filesystem but no other files on the host.
From what we learned, we know that 1) and 2) can be fulfilled by creating a new mount namespace and setting the mount points propagation type to MS_SLAVE. And 3) can be achieved by pivot_root or mount move (we’ll use the latter) followed by chroot.
We only need a few lines of code change. The core piece of code now looks like this:
1
2
3
4
5
6
7
8
9
10
11
12
13
14
15
16
17
18
19
20
21
22
23
24
25
int main(int argc, char *argv[]) {
  int cpid = fork();

  if (cpid == -1) {
    errExit("fork");
  }
  if (cpid == 0) {
    unshare(CLONE_NEWNS);                                // (1)
    mount("", "/", NULL, MS_SLAVE | MS_REC, NULL);       // (2)
    mount(rootfs, rootfs, NULL, MS_BIND | MS_REC, NULL); // (3)
    chdir(rootfs);                                       // (4)
    mount(rootfs, "/", NULL, MS_MOVE, NULL);             // (5)
    chroot(".");                                         // (6)
    chdir("/");                                          // (7)
    mount("", "/", NULL, MS_SHARED | MS_REC, NULL);      // (8)
    mount("proc", "/proc", "proc",
          MS_NOSUID | MS_NOEXEC | MS_NODEV, NULL);       // (9)
    execv(argv[1], &argv[1]);
  } else {
    if (waitpid(cpid, NULL, 0) == -1) {
      errExit("waitpid");
    }
  }
  return 0;
}
Basically, we
- Create a a new mount namespace.
- Change the propagation type of of all mount points under “/” to
MS_SLAVEso that changes in the container won’t propagate to the host but changes from the host can be received. - Bind mount the
rootfsdirectory to itself (equivalent tomount --bind rootfs rootfs) so that it becomes a mount point. The reason of this operation is, we need to do the mount move operation later and the source of such an operation must be a mount point. - Enter the
rootfsdirectory. - Move mount point
rootfsfrom itself to “/” (effectivelymount --move rootfs /). - Change the root directory to
rootfs. - Enter the new root directory.
- Make the propagation type of all mount points under “/”
MS_SHAREDso that changes in the container will be propagated to its children if any. Not that this doesn’t change the master-slave relationship with the host namespace. - Mount procfs for the contain. This is for
/proc/PID/mountinfoto be visible. More on this in the next article when we talk about PID namespace.
After these steps, the child process (container) should have an isolated filesystem.
See this commit for complete code.
Test
Let’s do some testing. Note that I am going to cheat a little bit here by using docker centos image. If interested, you may take a look at Buildroot to build a rootfs from scratch.
Prepare rootfs
1
2
3
4
# Pull centos 8 image
$ sudo docker pull centos:8
# Bind mount the rootfs to /tmp/mini_container/rootfs
$ sudo mount --bind /var/lib/docker/overlay2/e0c3a2bff3947554a586ca8da78f728547053356c4aec4d311eb355beed5242a/diff /tmp/mini_container/rootfs
Build mini container
1
2
3
4
$ mkdir build
$ cd build
$ cmake ..
$ make
Run “/bin/bash” in a container
1
2
3
4
5
6
7
8
9
10
11
12
13
14
$ sudo ./mini_container --rootfs /tmp/mini_container/rootfs "/bin/bash"
[Agent] The container's pid is 23089
[Agent] Agent pid is 23088
[Container] Running command: /bin/bash

# The container's "/" is isolated
[root@hechaol-vm /]# ls /
bin  etc   lib    lost+found  mnt  proc  run   srv  tmp  var
dev  home  lib64  media       opt  root  sbin  sys  usr

# Mount info in container
[root@hechaol-vm /]# cat /proc/self/mountinfo
2044 1997 8:5 /var/lib/docker/overlay2/e0c3a2bff3947554a586ca8da78f728547053356c4aec4d311eb355beed5242a/diff / rw,relatime shared:674 master:1 - ext4 /dev/sda5 rw,errors=remount-ro
2045 2044 0:62 / /proc rw,nosuid,nodev,noexec,relatime shared:675 - proc proc rw
Verify that the agent and the container are in different mount namespaces
1
2
3
4
5
6
7
# Agent
$ sudo readlink /proc/23088/ns/mnt
mnt:[4026531840]

# Container
$ sudo readlink /proc/23089/ns/mnt
mnt:[4026532761]
Mount something in the container
1
2
3
4
5
6
7
8
9
[root@hechaol-vm /]# mkdir /tmp/source /tmp/target
[root@hechaol-vm /]# echo "Hello" > /tmp/source/hello
[root@hechaol-vm /]# mount --bind /tmp/source/ /tmp/target/
[root@hechaol-vm /]# cat /tmp/target/hello
Hello

# Mount info
[root@hechaol-vm /]# cat /proc/self/mountinfo | grep target
2046 2044 8:5 /var/lib/docker/overlay2/e0c3a2bff3947554a586ca8da78f728547053356c4aec4d311eb355beed5242a/diff/tmp/source /tmp/target rw,relatime shared:674 master:1 - ext4 /dev/sda5 rw,errors=remount-ro
Make sure the host doesn’t see the mount point
1
2
3
4
5
$ sudo cat /tmp/mini_container/rootfs/tmp/target/hello
cat: /tmp/mini_container/rootfs/tmp/target/hello: No such file or directory

$ sudo cat /proc/self/mountinfo | grep -c "target"
0
Mount something on the host
1
2
3
4
5
6
7
8
$ mkdir /tmp/host_source /tmp/mini_container/rootfs/tmp/host_target
$ echo "World" > /tmp/host_source/world
$ sudo mount --bind /tmp/host_source /tmp/mini_container/rootfs/tmp/host_target

# Mount info
$ cat /proc/self/mountinfo | grep  "host_target"
884 1964 8:5 /tmp/host_source /tmp/mini_container/rootfs/tmp/host_target rw,relatime shared:1 - ext4 /dev/sda5 rw,errors=remount-ro
886 29 8:5 /tmp/host_source /var/lib/docker/overlay2/e0c3a2bff3947554a586ca8da78f728547053356c4aec4d311eb355beed5242a/diff/tmp/host_target rw,relatime shared:1 - ext4 /dev/sda5 rw,errors=remount-ro
Make sure it can be seen by the container
1
2
3
4
5
6
# In the container
[root@hechaol-vm /]# cat /proc/self/mountinfo | grep host_target
890 2044 8:5 /tmp/host_source /tmp/host_target rw,relatime shared:650 master:1 - ext4 /dev/sda5 rw,errors=remount-ro

[root@hechaol-vm /]# cat /tmp/host_target/world
World
Alright. Now we have a container with its own filesystem. We will continue isolating other resources in next articles.
Resources
[1] man mount(8)
[2] man mount(2)
[3] What is a bind mount?
[4] Mount namespaces and shared subtrees
[5] Mount namespaces, mount propagation, and unbindable mounts
[6] Shared subtrees
[7] man chroot(2)
[8] man pivot_root(2)
[9] Escaping a chroot jail/1

Comments powered by Disqus.