[This is the seventh article in this series. The previous one can be found here.
Summary
In the past few notes, with the help of Linux namespaces, we have limited what resources can be seen by a container. Starting from this note, we will be limiting how much resources can be used by a container with the aid of cgroups.
Let’s first learn some basics about cgroup. Note that I will only talk about cgroup v2, which will eventually replace cgroup v1. If interested in cgroup v1, see Documentation/cgroup-v1/.
Basics
cgroup
“cgroup” stands for “control cgroup” and is never capitalized. It organizes processes hierarchically (like a tree) and distributes system resources along the hierarchy[2]. Each process belongs to one and only one cgroup. In cgorup v2, except for the root cgroup, processes can only belong to a “leaf cgroup”, a cgroup that doesn’t have any child cgroups.
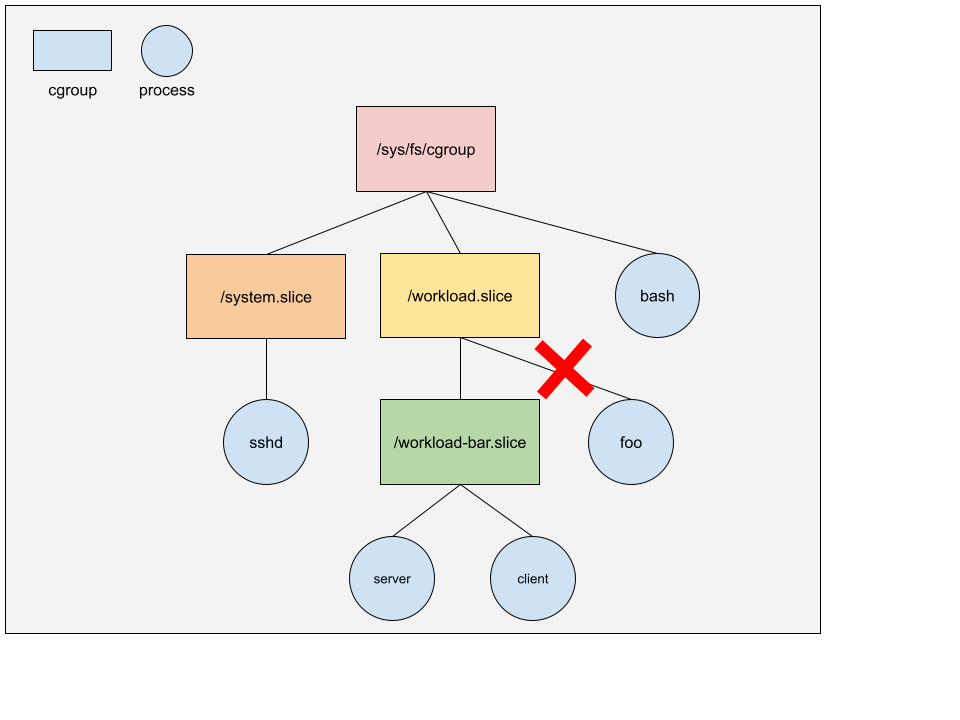
For example, in the following diagram,
- Process
bashbelongs to the root cgroup (i.e./sys/fs/cgroup/). Note that we don’t usually put processes directly into root cgroup. The diagram is only to illustrate that root cgroup can have processes. - Process
sshdbelongs to/sys/fs/cgroup/system.slicecgroup. - Process
serverandclientbelong to/sys/fs/cgroup/workload.slice/workload-bar.slicecgroup. - cgroup
/sys/fs/cgroup/workload.slice/can’t have any processes because it has a child cgroupworkload-bar.slice.
You may use systemd-cgls command to check out the cgroup hierarchy on a Linux
host.
A few things to note about cgroup (v2):
- cgroup interface is provided through a pseudo-filesystem (similar to procfs
we’ve seen while talking about PID namespace) called cgroupfs, which can be
mounted with command
mount -t cgroup2 none $MOUNT_POINT. The most commonly used mount point is/sys/fs/cgroup. - Upon creation, a process is put into its parent’s cgroup.
- A process can be moved to another cgroup while its child processes remain in current cgroup.
cgroup controllers
A cgroup controller is responsible for distributing a specific type of system resource along the hierarchy[2]. For example, a CPU controller controls the distribution of CPU cycles. Controllers can be enabled/disabled selectively. An enabled controller regulates the distribution of the target resource to the child cgroups. Note that a controller can be enabled only if it’s enabled in its parent. In other words, a cgroup can only distribute resources allocated to it by its parent.
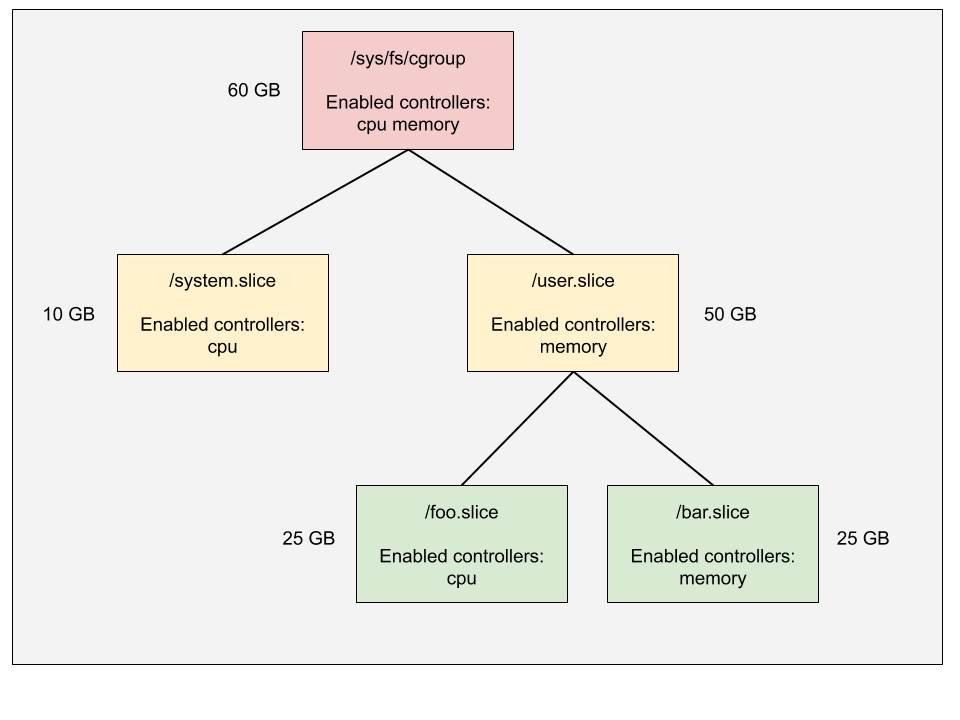
For example, in the following diagram,
- The root cgroup has both CPU and memory controllers enabled. It allocates 10
GB memory to
system.sliceand 50 GB touser.slice. - The
user.slicecgroup doesn’t have CPU controller enabled, which means its child cgroupsfoo.sliceandbar.sliceare going to compete the CPU cycles freely. - The
foo.slicecgroup can’t enable CPU controller as it’s not enabled in its parentuser.slice.
cgroup interface files
A cgroup can be configured via interface files, a list of files under the cgroup directory. There are 2 groups of interface files:
- Core interface files are files prefixed with cgroup: cgroup-level configs
can be read from/written into these files. Examples are
cgroup.procs- PIDs of all processes that belong to the cgroup.cgroup.controllers- All controllers available to the cgroup.cgroup.subtree_control- All controllers enabled on this cgroup subtree.- …
- Controller interface files are files prefixed with
: Controller-level configs can be read from/written into these files. Examples are cpu.max- The maximum CPU bandwidth limit.memory.max- Memory usage hard limit.
Experiment
Next, let’s do some experiments to get familiar with cgroup.
Create a cgroup
Creating a cgroup is as easy as creating a directory.
$ sudo mkdir /sys/fs/cgroup/test
Upon creation, interface files with default values are also created.
$ ls /sys/fs/cgroup/test/
cgroup.controllers      cgroup.type            cpu.weight       memory.events     memory.swap.current
cgroup.events           cpu.max                cpu.weight.nice  memory.high       memory.swap.events
cgroup.freeze           cpu.pressure           io.latency       memory.high.tmp   memory.swap.max
cgroup.max.depth        cpuset.cpus            io.low           memory.low        pids.current
cgroup.max.descendants  cpuset.cpus.effective  io.max           memory.max        pids.events
cgroup.procs            cpuset.cpus.partition  io.pressure      memory.min        pids.max
cgroup.stat             cpuset.mems            io.stat          memory.oom.group
cgroup.subtree_control  cpuset.mems.effective  io.weight        memory.pressure
cgroup.threads          cpu.stat               memory.current   memory.stat

# Initially, the cgroup doesn't contain any process
$ cat /sys/fs/cgroup/test/cgroup.proces

# No controller is enabled
$ cat /sys/fs/cgroup/test/cgroup.subtree_control
Do you notice something strange?
One question I had when I saw the output was, if no controller is enabled, then
why were the controllers’ interface files (e.g. cpu.max) created?
The short answer is, because these controllers are enabled in its parent cgroup (root cgroup in this case).
$ cat /sys/fs/cgroup/cgroup.subtree_control
cpuset cpu io memory pids
That is, enabling a cgroup controller will create the corresponding interface
files in its child cgroups instead of its own cgroup. The reason is simple,
when you enable a controller, what you mean is to regulate the resource
distribution to its children instead of to itself. That’s why the controller
enablement interface file is called subtree_control as it controls the
“subtree”. That means that the controller interface files – anything which
doesn’t start with “cgroup.” – are owned by the parent rather than the cgroup
itself [2].
This also implies that a cgroup’s cgroup.subtree_control file is same as its
direct children’s cgroup.controllers files because only the controllers
enabled by the parent are available to the children.
Add a process to the cgroup
Adding a process to a cgroup is as easy as appending its PID to cgroup.procs
file under the cgroup directory.
# Check the cgroup of the shell process. It belongs to user.slice.
$ cat /proc/$$/cgroup
0::/user.slice/user-172007.slice/session-59.scope

# Move the shell process into the newly created cgroup
$ echo $$ | sudo tee -a /sys/fs/cgroup/test/cgroup.procs
2954700

# Verify the migration
$ cat /proc/$$/cgroup
0::/test
Limit memory usage
We can configure the memory hard limit by writing memory.max file. In this
experiment, we will also set memory.sawp.max to zero to disallow swapping out
anonymous memory of the cgroup.
# Set max memory to 100MB
$ echo $((100 * 1024 * 1024)) | sudo tee /sys/fs/cgroup/test/memory.max
104857600

# Set max sawp memory to 0
$ echo 0 | sudo tee /sys/fs/cgroup/test/memory.swap.max
With this two configs combined, any process that uses more than 100MB memory will be killed. Let’s test it by running a memory eater.
$ cat memory_eater.py
import time
a = []
i = 0
while True:
    i += 1;
    a.append(' ' * 10 * 1024 * 1024)
    print('Ate {} MB'.format(i * 10))
    time.sleep(1)

$ python3 memory_eater.py
Ate 10 MB
Ate 20 MB
Ate 30 MB
Ate 40 MB
Ate 50 MB
Ate 60 MB
Ate 70 MB
Ate 80 MB
Ate 90 MB
[1]    247603 killed     python3 memory_eater.py
This memory eater was killed by a OOM (Out-Of-Memory) killer before eating more
than 100MB memory. This OOM event can be found in memory.events file.
$ cat /sys/fs/cgroup/test/memory.events
low 0
high 0
max 12
oom 1
oom_kill 1
Quiz
At this point, the attempt to enable memory controller in this cgroup will fail. Why? And how to make it work?
# Failed to enable memory controller. Why?
$ echo "+memory" | sudo tee /sys/fs/cgroup/test/cgroup.subtree_control
+memory
tee: /sys/fs/cgroup/test/cgroup.subtree_control: Device or resource busy
(You should know the answer if you remember two important points we mentioned earlier.)
Mini container: Limit memory usage
Next, we will add a feature to our mini container to allow the user to set the memory limit. Before jumping into implementation, let’s also examine some memory configs provided by the memory controller.
memory.low
If the total memory usage of a cgroup subtree is below this value, then this cgroup’s memory won’t be reclaimed unless the kernel really can’t find any other reclaimable memory. (Memory reclaiming is a topic on its own so I won’t cover it here.) This is a best-effort memory protection mechanism.
memory.min
Similar to memory.low. However, rather than “best-effort”, this config
provides hard memory protection. That is, If the total memory usage of a cgroup
subtree is below this value, then this cgroup’s memory won’t be reclaimed under
any circumstance. For more information, see mm: introduce memory.min.
memory.high
This is the main mechanism to control memory usage. If the total memory usage of a cgroup hits this limit, then all its processes will be throttled, meaning that they will be forced to memory reclaiming. Note that going over this limit won’t invoke the OOM killer. In other words, the processes won’t be killed but will experience performance degradation. It is possible that the sum of this value among all child cgroups is larger than the value of the parent cgroup.
memory.max
This is the final protection mechanism. It is the hard memory limit, meaning that if this limit is hit, then the OOM killer will be invoked.
To make the implementation simple, we will only allow the user to specify the
hard memory limit memory.max. Technically speaking, this config allows user
to set max “RAM” rather than “memory” because the container can still use swap
space once memory.max is hit without being killed.
Implementation
The code change is simple, we only need to implement what we did in the experiment in C++. See the following code snippet (error handle is omitted for simplicity).
void setupCgroup(int cpid, const ResourceLimit& limit) {
  // (1) Create a cgroup at <root>/<cpid>
  const std::string cgroupPath = getContainerCgroup(cpid);
  mkdir(cgroupPath.c_str(), 0755);

  // (2) Set up resource limit
  // Memory
  if (limit.maxRamBytes > 0) {
    long long memoryLow = limit.maxRamBytes * 75 / 100;
    long long memoryMax = limit.maxRamBytes;
    writeToFile(cgroupPath + "/memory.low", std::to_string(memoryLow));
    writeToFile(cgroupPath + "/memory.max", std::to_string(memoryMax));
  }

  // (3) Move the container process to the cgroup
  writeToFile(cgroupPath + "/cgroup.procs", std::to_string(cpid));
}
See this commit for complete source code.
Test
Since the code assumes mini_container cgroup already exists. We need to create it first.
Preparation
# Create mini_container cgroup
$ sudo mkdir /sys/fs/cgroup/mini_container/

# Enable all controllers
$ echo "+memory +cpu +cpuset +io +pids" | sudo tee /sys/fs/cgroup/mini_container/cgroup.subtree_control
Build & Run
# Build
$ make

# Run
$ sudo ./mini_container -v -r /tmp/mini_container/rootfs "/bin/bash" -R $((100 * 1024 * 1024))
[Agent] Container pid: 1727
[Agent] Agent pid: 1726
[Agent] Agent hostname: hechaol-vm
[Agent] Agent NIS domain name: (none)
[Container] Waiting for agent to finish preparation ...
[Container] Running command: /bin/bash
[Container] Container hostname: hechaol-vm
[Container] Container NIS domain name: (none)
Check cgroup
# Make sure the container's cgroup is created
$ systemd-cgls /sys/fs/cgroup/mini_container
Directory /sys/fs/cgroup/mini_container:
└─1727
  └─1727 /bin/bash

# Make sure the memory limits are set
$ cat /sys/fs/cgroup/mini_container/1727/memory.low
78643200
$ cat /sys/fs/cgroup/mini_container/1727/memory.max
104857600
Run the memory eater program inside the container
bash-4.4# python memory_eater.py
Ate 10 MB
Ate 20 MB
Ate 30 MB
Ate 40 MB
Ate 50 MB
Ate 60 MB
Ate 70 MB
Ate 80 MB
Ate 90 MB
Ate 100 MB
Ate 110 MB
Ate 120 MB
...
Check memory usage
$ systemd-cgtop mini_container
Control Group               Tasks   %CPU   Memory  Input/s Output/s
mini_container                  2    6.6   102.1M       0B    10.0M
mini_container/1727             2    6.6    99.9M       0B    10.0M
Note that in systemd-cgtop output, “Memory” will never exceed 100MB even though the memory eater has already eaten more than that. As I mentioned earlier, since only RAM usage is limited, the container can use more memory by leveraging swap space once the memory usage is over 100MB.
If we monitor memory.swap.current file, we’ll see its value is increased by
10MB per second:
$ while true; do cat /sys/fs/cgroup/mini_container/1727/memory.swap.current && sleep 1; done
2527051776
2537717760
2547994624
2558631936
2569408512
2579795968
2590318592
2600669184
2611118080
2622009344
2632335360
...
Resources
[1] man cgroups(7)
[2] Control Group v2